
The Ultimate French Braid How-To Guide
French Braids!
Every girl loves a good braid. I love the look of a French braid.
This post contains affiliate links. For more information, see my disclosure page here. As an Amazon Associate, I earn from qualifying purchases.
I feel like they go in and out of style, but one that you see the most often and is the most classic, at least where I live, is the standard French braid.
I learned to French braid hair when I was pretty young, probably around 7.
I was big into dolls, and only because I wanted to do their hair.
I loved “doing” hair from when I was old enough to figure out how to brush my dolls’ hair.
I even played “beauty shop” with my dad, giving him a beard trim and a shave, using his shoe as a pretend “shaver”.
My mom taught me how to braid. She’s been French braiding hair most of her life.
I know, you’re surprised that she taught me, right?
I’m being sarcastic here; she taught me a whole lot.
I started by watching her braid her own hair.
She is so talented with braiding, especially a regular braid and a French or Dutch Braid.
Then she taught me how to braid with my doll’s hair.
My favorite to braid was a doll similar to an American Girl doll that my grandparents gave me for Christmas.
I then moved my skills to my own French braid, which I was so proud of!
My stepdaughter asks me on the regular to braid her hair.
I love it because for the longest time, (I met her when she was almost 2, and she just turned 12) she wouldn’t let me do much to her hair.
I’d send her to school with a cute headband or ponytail and by the time we picked her up, her hair would be down and messy.
Pretty typical for a child, but now that she’s a little bit older it’s fun to style and braid her hair because she likes to get creative with it.
To my surprise, a lot of people don’t know how to French braid.
Braids are all over these days, in many different ways, but we are beginning to see the basic French braid a lot more.
French braids are really a classic hairstyle, and are so versatile, and can be worn in the gym or on the red carpet, just like Jennifer Lopez!
You don’t need to have a celebrity hairstylist to look amazing.
It truly is one of the best ways to add a little style to your hair.
I have short hair now and my hair is too short to French braid, but I’ve been toying with the idea of hair extensions just so I can wear a braid again!
If you’re one of those people and you’re looking how to learn, you’re in the right place!
I’ve created these easy steps for you to create the perfect French braid and to become a pro in no time!
First, before the simple steps, let me give you some helpful tips:
- Practice, practice, practice. If you have some dolls around it’s best to practice on them. Or, if you have a patient child or person to practice on, that works just as well.
- Dry hair works best. You can braid damp or wet hair, but the hair lays the flattest and looks the best if you braid the hair dry.
- Brush the hair thoroughly. You don’t want any snarled parts or knots in the hair you’re braiding.
- If you’re going for a braid for a little wave in the hair like my stepdaughter likes, it’s best to braid the hair damp, not wet, the night before and then sleep in it. Voila! In the morning you will have beachy waves when you take out the braid.
- When you reach the center of the head, make sure you ask the person you’re braiding to look down. I mean look down, not just lower. Like at the feet. This will keep the braid tight and keep the hair there from looking loose or messy.
- You can part the hair down the middle and section off two sections on both side of the head for two braids if you’d like. It’s a touch trickier, so it may be good to get a solid good one down before you move to two.
- The traditional three-strand braid is basically moving strands of hair from either the right side or the left side and repeating. French braiding is very similar, but with adding a new section with equal pieces.
Okay! Now, on to the classic French braid tutorial!
Here’s a step-by-step tutorial for you! I’ll be adding a video tutorial soon!
Step by step instructions:
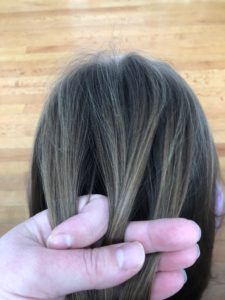
1. Starting at the top of your head, brush the hair into a part of hair similar to a “half up” hair style, but less hair and higher up. Like this:

If it becomes too hard for you to section the hair, you can secure the half up hair section with a hair elastic to practice.
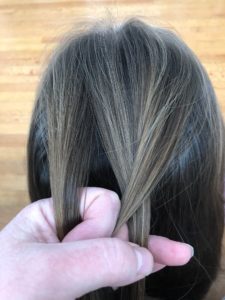
2. This braiding technique is done with three stands, so you want to section off three equal sections of hair. If you end up with a larger section, start over and make sure they are as equal as you can make them, like this:
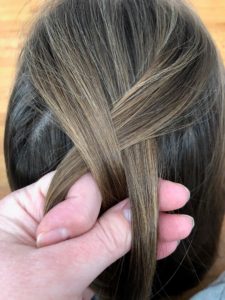
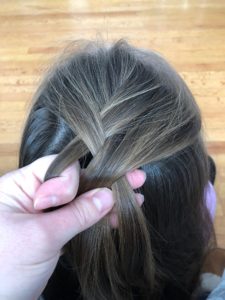
3. Starting at either the right hair strand or the left strand, whichever feels natural for you, cross one of the side sections over the middle strand. I always start with the right strand with my right hand and move it over the center section. Make sure you’re sectioning off enough hair. The center strands then becomes the outer right section. If you started with the left piece, or the left section of hair using your left hand, the middle section would then become the outer left section. Like this:
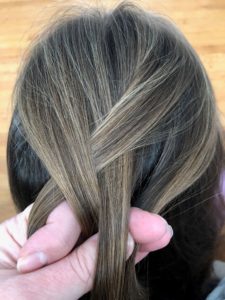
4. Repeat with the opposite side. So, if you started with the right piece, now take the left small section of hair and place it over the center section. Like this:
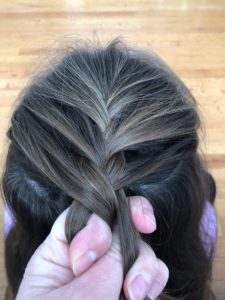
5. From here, you basically repeat, but you’re going to add hair from the remaining hair below that braid until it is all incorporated into the French braid. You want to be somewhat consistent in the amount of additional pieces of hair you’re adding so the braid looks uniform from top to bottom. I usually gauge it by the first knuckle of my index finger. Take some hair from the hair that is down and add it into the strand you will be crossing over the middle.
It will look like this:
6. Keep braiding but remember to add hair from the bottom hair that isn’t in the braid as you continue. If you’re on the right side going to cross over the center, then you will grab hair from the bottom right section of hair. Same on the opposite side. It will start to look like this:
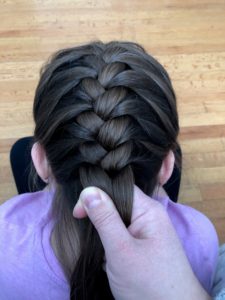
7. When you reach the half way down point, start asking the person to look down. If you don’t do this, you can end up with a loose braid. This will keep the French braid tight and will look better, especially at the nape of the neck. In the picture, I’ve asked her to look down:
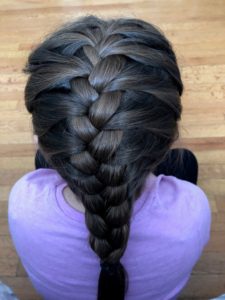
8. When there’s no more hair to add from the bottom, you just continue to braid normally, without adding any more hair, for the rest of your hair. When you’ve come to the bottom of the braid by the nape of your neck, you fasten it with hair ties or elastic band (click here for the ones I use and love). Avoid using a rubber band because that can damage your hair. Voila! You’ve just created a French braid! Easy right?
If you have some stray baby hairs falling, you can use bobby pins the color of your hair to hide them.
If the ends of your hair stick out, this can happen because of layered hair.
Bobby pins come in handy for that too, for a finished look.
Now that you’ve learned how to take a regular three-strand braid up a notch, you can make lots of different styles and cute creations!
This is a really cute hairstyle if you create a double braid as well, or as French braid pigtails! I’ve done a French braid ponytail too.
These braids work well with curly hair and fine hair too!
Another cute way to style a French braid is to start upside down at the nape of the neck and make a French braid bun on the top of the hair.
A different way you can style it is to start at the crown of the head of one side and move diagonal across and down to the right side of the head or the other.
The final look is up to you!
If you have any questions, please feel free to ask!
Happy braiding!
Carissa


You May Also Like

18 Comments
Miranda
Yeah I still don’t get it, I end up with huge gaps and all it does is fall out. So frustrated.
Carissa
I’m sorry you are frustrated. It took me a long time to get it. It just takes practice. Where are the gaps? If they are on the sides, try pulling the braid tighter as you go. If they are toward the neck, make sure you have the person look down, and pull tighter. I hope you get it soon! Thanks for stopping by!
Carissa
Julia
This helped me a lot, thanks!
Carissa
You’re welcome! I’m so glad I could help!
Carissa
Adrianna
That helped me so much and thanks to you I am able to do two braids on both sides of my own head. Thank you so much for sharing that with us.
Carissa
I’m so happy to read this! Yay! You’re welcome! Thanks for stopping by!
Emily
I loved this ! I have frenches down I just didn’t u see why they would come out so loose on my 6 year old daughter because I would be pulling super tight ! She would be like owwwwww mommy ! Lol and it completely solved just by having her look at her toes and stand up mid way through !! Thanks so much ! So simple and such a big fix! 🙂 thanks again girl !
Carissa
So happy that this helped you! Thanks for stopping by!
Carissa
Carissa
You sure can! You can do as many as you’d like.
Carissa
Joann
Enjoyed this tutorial. I can only do my hair by feeling what I’m doing. Haha cannot do someone’s hair by looking at it. Guess I have hair dyslexia!!!
Jnel
Should i only add hair to the what is in the middle of the braid? I’m always trying to add to both sides and middle each time.
Carissa
You should add hair, each time, to the strand you will be crossing over.
Kirsten/ Molly’s Momma
So technically you never add hair to the middle piece?? 🤦🏼♀️🤦🏼♀️ I’m almost 32 years old, total girly-girl, love doing different things with my hair… even had a book growing up teaching me all kinds of different braids but I just have never been able to figure out the French braid! — so embarrassing! lol — but now I have a daughter who’s about to be 5, and she loves gymnastics, dancing, twirling… and she has long, thick, beautiful blonde hair so I have GOT to figure this braid out!! <> I really appreciate the step by step instructions, including the pictures!!
Carissa
Correct! You just add hair to the piece you are going to fold over. I’m glad I could help you! It just takes practice. Thanks for stopping by!
Zala Hair
Love this French braid tutorial!!!! Thanks for sharing the detailed step by step guide….you made it look so easy!!!!
Zala
(https://www.zalahair.com/)
Carissa
Thank you for stopping by! I’m glad you enjoyed it!
Carissa
Chelsea
How do you keep the base tight when you’re braiding your own hair?
Carissa
Hi Chelsea,
For me, I just make sure I keep a firm grip, and keep tightening the braid each time I grab a new piece of hair.